Sotai seen in the video Part1
“Sotai at home”
Table of Content
Prologue
It is important to communicate with your body in order to live a healthy and comfortable life. I hope you’ll learn how to do this in this textbook.
Sotai is an “exercise therapy” that cures by moving in a comfortable direction. By moving it in a comfortable direction, it relaxes the muscles and returns it to a neutral state.
The muscles are not tense on their own, but are tense by exchanging information with the brain. If you move it in the direction of pain, a signal that it hurts will be sent to your brain. Then the brain feels dangerous and tries to strain and protect the muscles. Conversely, if you move it in a comfortable direction, the signal from your brain to be tense will be stopped and your muscles will relax.
Sotai is an exercise therapy that changes information from the brain by moving the body in a comfortable direction and relaxes the muscles.
Usually, you only care about the direction of pain and tend to move in the direction of pain. Even in stretching and gymnastics, I started from the painful part and assumed that if I move it even if I force it, it will move, and as a result, I repeat the same pain every day. That is a mistake. First, let’s move it in a comfortable direction.
You can do sotai by yourself, but if you have someone to support you, it will be easier for you to exert effective and stable force.
Sotai always starts with your feet. Because the feet are the foundation. The head rests on the body, the arms are hanging, and the movements of both legs are linked at the waist. Therefore, if you adjust the balance from the base foot to the pelvis and then to the spine along the pillars of the body, you can restore the balance of the body more easily and dramatically than you think.
In Sotai, you move in a comfortable direction and within a comfortable range. It will be easier to move if you have a person hold it lightly.
While counting “3, 2, 1”, keep moving. And saying “Ston(plunk)”, go limp. Repeat it 3 times and then compare left and right. If you feel a little more, repeat it 3 times. If that doesn’t help, try the next move.
If neither hurts, or neither hurts, it won’t move. Also, if you feel that the outside is easier and the inside is easier, move it to a comfortable place and stop.
When doing sotai alone, it is easier to apply force by hitting a large cushion in the direction you want to move.
Sotai is communication with your body, but if you can support each other, it can be a communication tool for your family and team. Please try it.
I. First from the feet
1. Check your body balance
Let’s check the balance first. Let’s see the change in the length of the legs when the face is straightened while lying down and when facing right and left. If you have any symptoms on your neck, your leg length will change from right to left. Also check the height and tension of your waist and back.
2. Foot massage
- Base of toes – 02:18
- Acupressure on the sole of the foot – 03:56
- Ankle – 05:17
- Shins and calves – 05:52
- Knees, thighs, groin – 06:47
- Base of toes (the other side) – 08:27
- Acupressure on the sole of the foot (the other side)-08:44
- Ankle (the other side)-10:07
- Shin and calf (the other side)-10:27
- Knees, thighs, groin (the other side)-10:50
In this section, you will massage your feet in a lying position.
Base of toes
Start the massage from the base of your toes. Put a pillow on the back of the knee, support the instep from the heel, and massage from the thumb to the little finger in order.
Shiatsu on the sole of the foot
Move on to the acupressure on the soles of the feet. With a light touch that is not strong, you will feel acupressure rather than pressing. Acupressure the arch between the metatarsal bones to the heel, with the inner line, middle line, and outer line.
Ankle
Turn the ankle. Turn it inward and turn it outward to make sure it doesn’t hurt. Support your ankle from the inside and use your other hand to apply acupressure to hold the outside of the shin shin.
From the ankle to the base of the foot
Next, support the outside of the ankle and wrap the owl from the inside with the other hand and apply acupressure to hold it down. Do not push hard. While bending and supporting the knee, massage from around the knee joint to around the thigh and hip joint by pressing and shaking from the fingertips to the entire palm.
Never push hard. Acupressure that pushes muscles strongly crushes and damages muscles made up of fine fibers. Even if you press hard, the muscles in the deep part will not loosen, but you can loosen the deep muscles by pressing and shaking to suppress it.
In my treatment, I try to interact with the patient and deepen the interview during this pleasant and relaxing massage.
3. Lower body sotai
- Toes and heels – 12:08
- Inside / outside of the sole – 13:15
- Twist the entire foot inward and outward from the base of the foot – 14:05
- Inside / outside of the sole (opposite side)-14:28
- Twist the entire foot inward and outward from the base of the foot (opposite side) -14: 51
- Raise one knee (about 45 degrees) and tilt it inward / outward – 15:50
- Raise both knees (about 45 degrees) and tilt left / right – 17:37
- Raise your knees (about 45 degrees) and raise and lower your hips – 18:03
- Stick out the hips and pelvis forward and backward – 18:46
- Raise one knee (about 90 degrees) and tilt it inward / outward – 19:17
- Raise both knees (about 90 degrees) and raise and lower the left and right hips – 20:48
- Raise both knees (about 90 degrees) and tilt left / right – 21:11
- Raise one knee (about 120 degrees) and tilt it inward / outward – 21:32
- Raise both knees (about 100 degrees) and raise and lower the left and right hips – 22:15
- Raise both knees (about 100 degrees) and tilt left / right – 22:42
So, let’s start with the sotai method from the toes. ③ ④ ⑤ restores the balance of muscle groups in the lower leg, such as in front of the calf and shin. The treatment is performed in a lying position.
③ Toes and heels
I will lie on my back. Raise your knees and raise your toes. Raise your heels. Check which one is easier. If your toes are comfortable, try raising your toes while holding them lightly from above.
Go limp with “3, 2, 1, ston(plunk)”(mentioned above). Repeat 3 times. Gradually bring your feet closer to your hips and check your toes and heels again. Let’s move it to the easier one. Bring the position closer to your waist. Check who is comfortable. It may be easier to raise your heels as your feet move closer to your hips.
How is it, isn’t this just making your legs lighter? If you start with this movement at the beginning of the sotai method, it will be easier to understand the feeling of exerting and relaxing. I decide the optimum position by touching the lump on the back of the knee, but it is a little difficult so let’s do it 3 times in 3 places.
④ Move soles inward / outward
Move the sole of the foot inward and outward (varus valgus) to check the ease of movement. If the outside moves comfortably, lightly hold your hand from the instep and try to put pressure on the outside. Again, it’s “3, 2, 1, ston(plunk)”.
⑤ Twist the entire foot inward and outward from the base of the foot
Raise your toes and twist your entire foot inward and outward. Check which one is easier to move, inside or outside. Let’s move in a comfortable direction while getting tension to support it.
From ⑥ to ⑮, the balance of the muscle groups from around the hip joint to the back of the lumbar region is restored.
⑥ Raise one knee (about 45 degrees) and tilt it inward / outward.
Raise one knee and tilt it inward and outward to check the comfortable direction and move it. It will be easier to move if you support it. If the outside is comfortable, press it from the outside, and if the inside is comfortable, press it lightly from the inside.
All sotai methods move in a comfortable direction and within a comfortable range.
⑦ Raise one knee (about 45 degrees) and tilt it inward / outward.
Raise both knees and tilt them to the right and left to check the comfortable direction and move.
⑧ Raise both knees (about 45 degrees) and raise and lower the left and right hips
Raise your knees and raise and lower your hips. Check and move the right side, left side, and comfortable direction.
⑨ Protrude the waist and pelvis forward and backward
Raise your knees and pull your navel to lift your hips. On the contrary, lower your hips and bend your hips. Check the comfortable direction and move it.
⑩ Raise one knee (about 90 degrees) and tilt it inward / outward.
Raise one knee and bring your knee closer to your abdomen to deepen the angle. Tilt it inward and outward. It will be easier to do it if you support it so that the way of defeating it is stable. If the outside is comfortable, press it from the outside, and if the inside is comfortable, press it lightly from the inside.
⑪ Raise both knees (about 90 degrees) and tilt to the left and right
With both knees close to the abdomen and at a deep angle, tilt both knees to the right and left to twist your body, check the comfortable direction and move.
⑫ Raise both knees (about 90 degrees) and raise and lower the left and right hips
(Deepen the position of movement of ⑧) Place both knees on the caregiver’s knee and step on the right foot and left foot. Check the comfortable direction and move it.
⑬ Raise one knee (about 120 degrees) and tilt it inward / outward
Raise one knee and bring your knee closer to your abdomen to deepen the angle. Tilt it inward and outward to check the comfortable direction and move it.
⑭ Raise both knees (about 100 degrees) and tilt to the left and right
Bring both knees deeply close to your abdomen, tilt to the right and left, twist your body, check the comfortable direction and move.
⑮ Raise both knees (about 100 degrees) and raise and lower the left and right hips
In a deeper position, place both knees on the caregiver’s knees and step on the right and left feet. Check the comfortable direction and move it.
By changing the angle of the hip joint deeply, the muscles used when moving the position of the knee will change. If you go deeper from a shallow angle position to about three steps, it will be easier to understand that the muscles you are using are different. You can do it without support, but by supporting it, the direction of movement is stable and it is more effective.
II. Next, let’s move on to the upper body sotai method.
- Bend your wrist back and forth – 00:18
- Rotate your wrist in and out – 00:45
- Bend and stretch your elbows – 01:06
- Rotate the arm inward and outward around the elbow – 01:33
- Rotate the arm inward and outward around the shoulder – 01:54
- Raise / lower your hand – 02:24
- Bend your wrist back and forth (opposite side) -02:58
- Rotate the wrist inward / outward (opposite side)-03:15
- Bend / extend the elbow (opposite side)-03:36
- Rotate the arm inward and outward around the elbow (opposite side)-03:57
- Raise / lower your hand (opposite side)-04:12
- Lower and raise shoulders one by one – 04:34
- Lower and raise both shoulders – 05:15
- Stick your shoulders forward – 05:36
- Raise / lower chin – 06:33
- Turn your face to the right or left – 07:07
- Why start with your feet – 07:27
- Tilt your neck left and right – 09:04
- Stretch your left and right legs – 09:25
In this section, you will perform the upper body treatment in a lying position.
From ⑰ to ㉒, the movement of the shoulder from the elbow is restored.
⑰ Bend your wrist back and forth
Let’s do sotai from the wrist. Check and move the wrist in a comfortable direction with dorsiflexion / palmar flexion. Check the little finger lateral bending and thumb lateral bending in the same way. Restores the balance of the forearm muscles such as tendonitis.
⑱ Rotate the wrist inward / outward
By twisting the wrist inside and outside, you can check and move in a comfortable direction.
⑲ Bend / extend the elbow
By bending and stretching your elbows, you can check and move in a comfortable direction.
⑳ Rotate the arm inward and outward around the elbow
Bend the elbow 90 degrees and twist it inside and outside to check the comfortable direction and move it. If you support your elbows and apply resistance from the opposite side of the direction in which you move comfortably, it will be easier to apply force.
㉑ Rotate the arm inward and outward around the shoulder
Bend your elbows and move your arms from the inside and outside of your body and from your shoulders to move them in a comfortable direction.
㉒ Lower and raise shoulders one by one
Move one shoulder down toward your foot. After confirming the right and left shoulders that can be moved comfortably, move the shoulder on the opposite side while lowering the shoulder on the comfortable side. The caregiver grabs both wrists and resists each arm in the opposite direction of movement. Restores the balance of the trunk from the neck muscles.
㉓ Raise / lower both shoulders
Perform the movement of ㉒ on both shoulders in the same direction. It raises and lowers both shoulders, and moves while applying resistance to the direction in which it moves comfortably.
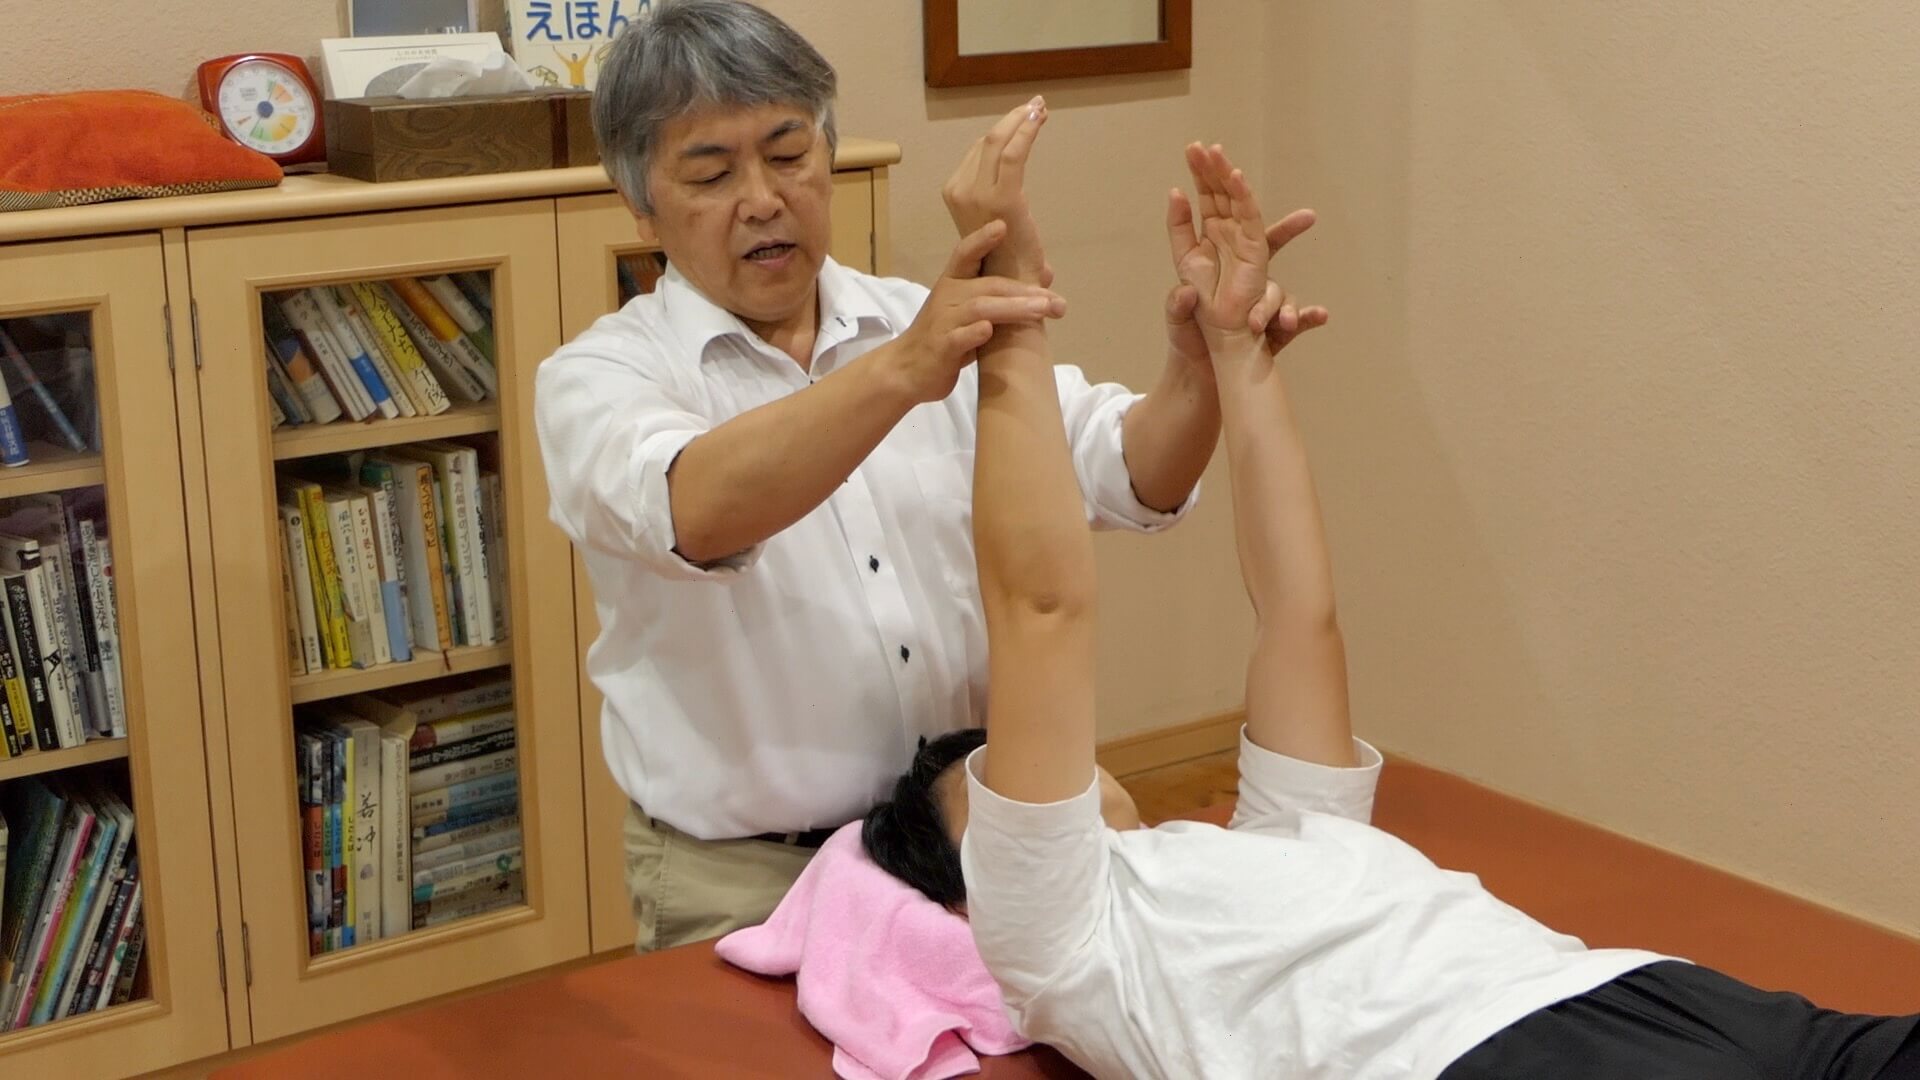
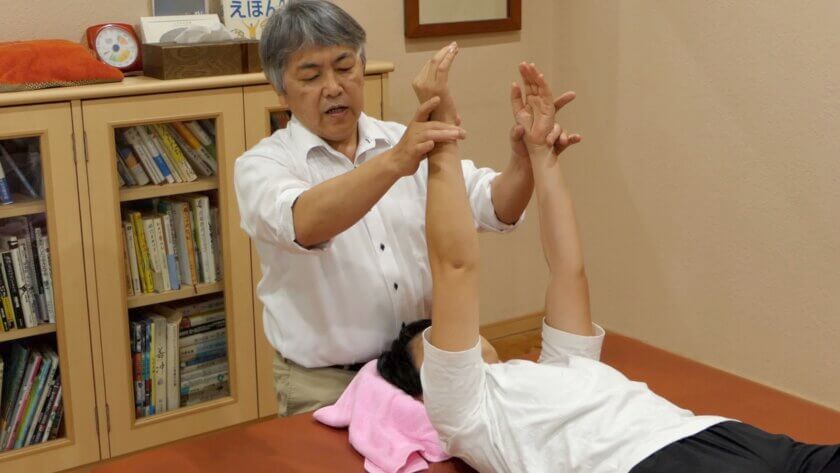
㉔ Raise / lower your hand
Raise your arms while having your wrists supported by your elbows. Raise and lower your arms. Check which one is easier. If you apply a little resistance, it will be easier to apply force.
From ㉕ to ㉗, how to manipulate the neck
㉕ Raise / lower your chin / turn your face to the right / left / tilt your neck to the left or right
Let’s move on to the neck sotai method. Remove the pillow while lying on your back. Raise and lower your chin. Face to the right and to the left. Tilt your head to the right, tilt to the left. Check the comfortable direction in order and move it.
㉖ Stretch your left and right legs
Extend from the right foot, left foot and heel to the back of the knee, check the direction in which you can easily extend it, and move it.
The erector spinae muscles that support the spine are connected from the neck to the waist. This stretching that stretches the left and right legs improves the balance of the erector spinae muscles, making the movement of the neck easier than expected. Also, if you fall asleep, this method will help you.
㉗ Raise / lower your chin
Let’s move on to the method of manipulating the temporomandibular joint. It’s a little difficult, so make sure you know how to do it.
Open your mouth slightly and move your lower jaw forward and backward to see the comfortable direction. Hold it lightly, move it in a comfortable direction, and relax slowly with 3,2,1. Please be careful not to suddenly relax. In the same way, open your mouth small and move your lower jaw to the left and right to slowly relax at 3,2,1.
The longer you use your smartphone and the longer you look down, the stiffer your temporomandibular joints, the harder your mouth will open, and the more stiff neck and stiff shoulders. This manipulative method also cures mild temporomandibular disorders.
III. Get in a prone position
- Twist your toes outward / inward – 11:08
- Twist your toes outward and inward (both feet)-12:02
- Bend your toes to your hips and check your tight feet – 12:23
- Raise your toes and step on your heels – 12:41
- Stand below your knees and tilt them inward and outward – 13:16
- Stand your knees behind and tilt them to the right and left (with both feet)-14:06
- Lift one knee to the side of your body – 14:55
- Twist your hips to the right and left – 15:45
- Checking foot balance – 16:12
Cushions under your chest and under your ankles can help you get into a comfortable position when you are in a prone position. Observe whether the balance you checked at the beginning is improved by the sotai method on your back.
㉘ Twist your toes outward and inward
Bend one knee to support your toes from your heels. Twist your toes inward and outward to see and move in a comfortable direction.
It eliminates the discomfort of those who have a discomfort from the sacroiliac joint to the lower back and those who have a discomfort from the knee joint to the ankle.
㉙ Twist your toes outward and inward (both feet)
Bend your knees to support your toes from the heels of your feet together. Twist the right side and the left side to check the comfortable direction and move it. There is no need to twist with strong force. The discomfort from the lumbar region to the sacroiliac joint is eliminated.
㉚ Stand your knees behind and tilt them inward and outward.
Bend one knee with your face down and try to tilt it inward and outward. Check the comfortable direction and move it. Defeat it with a light force while having it supported within a comfortable range.
㉛ Stand your knees behind and tilt them to the right and left (with both feet)
Bend both knees while lying down and tilt them to the left and right. Check the comfortable direction and move it.
㉜ Raise your toes and step on your heels
With your face down, first bend your right and left knees toward your hips. Extend the knee on the side that is difficult to bend. Raise your toes and extend the back of your knees so that you can stretch them from your heels. If your knees are difficult to bend, you can extend your legs. The tension in front of the thigh (quadriceps) is eliminated.
Sotai is a method of healing by moving it in a comfortable direction, so if you bend it and it hurts, do not bend it and stretch it in the opposite direction.
㉝ Lift one knee to the side of your body
Try moving your right knee and left knee in order to pull them out of your body while lying down. Let’s see which leg is easier to lift. Raise your knees in a comfortable direction and within a comfortable range. It will be easier to apply force if you support the ankle by pulling it lightly.
It is effective to extend the opposite leg from the heel. The discomfort of the left and right pelvic floor muscles and the muscles around the lumbar region is eliminated.
㉞ Twist your hips to the right and left
Let’s lie down and stretch your left and right legs to get a comfortable posture. Twist the pelvis left and right. Raise your right butt, raise your left butt, compare the twisting movements to the left and right, and check the comfortable direction to move. It will be easier for you to apply force if you lightly touch your hand and have it support you to apply resistance.
IV. Sit down and finish sotai
- Stick one knee forward – 17:00
- Raise one knee up – 17:31
- Shake your toes inward and outward around your knees – 18:02
- Shake your toes inward and outward around your knees (both feet)-18:33
- Put your hands behind your head and open / close your elbows – 18:53
- Put your hands behind your head and twist your hips from side to side – 19:16
- Put your hands behind your head and tilt your body to the left and right – 19:33
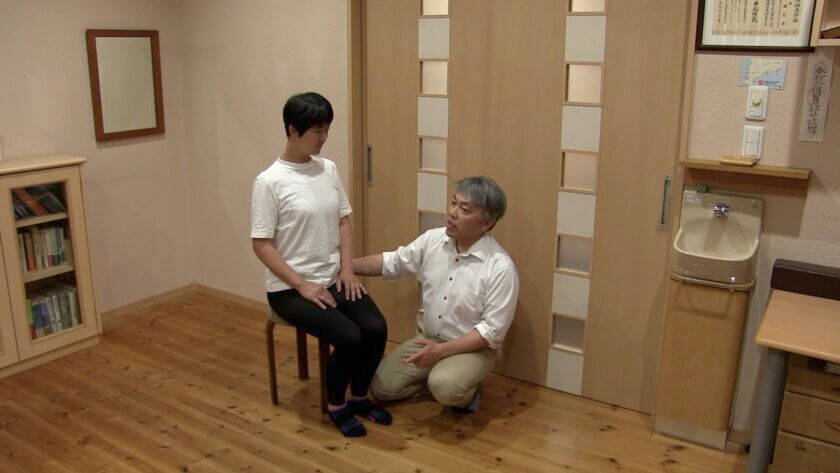
Let’s sit in a chair and do sotai. A chair that is high enough to sit deep and reach your heels is suitable. You can also sit down and do sotai in the office or on the moving train. All lower body movements restore the balance of the muscle groups around the sacroiliac joint. Upper body movement restores the balance of your core muscles.
The sitting manipulative method is a fine-tuning movement of the whole, but you can feel free to do it anywhere even at work.
First of all, from the lower body sotai method.
㉟ Stick one knee forward
Sit in a chair, put your left, right and hips forward in order, and twist left and right alternately. Try twisting while sticking out your knees in a comfortable direction.
㊱ Raise one knee up
Raise your right knee and then your left knee in that order, as if you were sitting in a chair and stepping on it. Raise the comfortable knee and hold it lightly with your hands. Step on the opposite foot.
㊲ Shake your toes inward and outward, centering on your knees
While sitting in a chair, pull one leg slightly and shake your legs inward and outward. Move in a comfortable direction and within a comfortable range. It will be easier to put effort into it if you support it.
㊳ Shake your toes inward and outward around your knees (both feet)
While sitting on a chair, align your feet and swing left and right to check the comfortable direction and move.
Next, let’s do the upper body sotai.
㊴ Put your hands behind your head and open / close your elbows
Put your hands behind your head, open and close your elbows, and move them in a comfortable direction.
㊵ Put your hands behind your head and twist your hips left and right
Put your hands behind your head and twist your body to the left and right to check and move in a comfortable direction.
㊶ Put your hands behind your head and tilt your body to the left and right
Put your hands behind your head and tilt your body to the left or right to check and move in a comfortable direction. When tilting to the right, put your weight on your left butt, and when tilting to the left, put your weight on your right butt.
This is the end of the Sotai treatment.
epilogue
The order of the sotai, starting with the feet, is the order I thought of to make the sotai go smoothly. Sotai will proceed while looking for easy movements. Basically, move in a comfortable direction. It’s the same for stretching, yoga, and gymnastics. The important point is “become good at the easy part, postpone the painful part, and stop if you feel unpleasant”. Bullying a painful area will never improve it.
With this text, you will be able to roughly learn how to use sotai and how to move. Sotai begins with the lower body. Restoring the balance of your entire body without being bound by a single pain is the best way to communicate with your body and feel better.
Sotai also helps with a medical examination called “movement”. Body ache from diseases of internal organs does not go away even if you move it in a comfortable direction. In many cases, physical activity does not increase the pain.
As I always check, I ask patients who complain of pain, “Do you have a resting and pain-free posture?” If you have a pain-free and resting posture, you can start sotai. If you feel pain no matter where you put your body, you will be referred to the clinic because you suspect a medical condition. Also, if there is no improvement in the sotai method, we recommend that you consult the internal medicine as soon as possible.
Face your body and communicate. You can change your consciousness and way of thinking. Then, think broadly and broadly, from self-treatments that you do yourself to the health of people around you, such as your family and team.
It is you from today that will protect your body ten years from now. “Don’t get bored, don’t forget, don’t try too hard”. Even if it lasts only three days, if you do it ten times, it will be thirty days.
Extra: Improvement of initial symptoms of water accumulation in the knee, improvement of knee fatigue
Many people suffer from water buildup in their knees, but in many of the early stages of water buildup in the knees, water first builds up in the back of the knee. If the initial symptom is mild, the progress of the symptom can be suppressed by performing the improvement action introduced in the video.
While sitting on a chair, insert the fingers of both hands into the back of your knees and lift your feet with the power of your hands. Then, repeat the action of swinging the knee back and forth like a swing about 10 times. Do not apply strong force to the fingers that are inserted into the back of the knee, but apply as much force as the legs can be lifted.
The fact that it just accumulates and does not escape causes water pooling and swelling, but this action creates a flow in which the accumulated water escapes, leading to improvement of symptoms. It is also effective in improving slight knee stiffness and fatigue.
Watch other videos

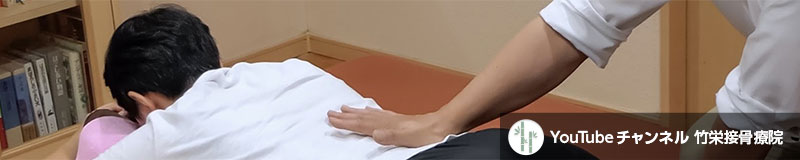
The videos on this site are available on YouTube. Please subscribe to our channel.